Understanding the Yocto Build System
1. Introduction
In this document, I’ll organize the key concepts I studied while working with the Yocto Project’s build system for building and deploying embedded Linux systems.
The Yocto Project proudly displays its “Mega Manual” on the homepage - and trust me, it’s mega for a reason! Given the sheer volume of documentation, trying to master everything doesn’t make much sense at my level. So I’ll focus on the important parts and explain them with helpful diagrams.
I’ll kindly provide you with the link here, feel free to dive in → mega-manual
This contains a lot of my subjective analysis through googling, so if you want more objective analysis, please refer to the link above.
2. A Fun Look at History
The Yocto Project has its roots in the OpenEmbedded Project.
The OpenEmbedded Project is said to have started when Sharp (familiar to me through electronic dictionaries) released their ROM images under Open Source license.
(Those were the good old days…)

Based on this, the OpenZaurus Project was launched in 2002. (Zaurus was a PDA)
![]()

Over time, it evolved into the OpenEmbedded Project, which adopted Debian-based package management and build methods (Ubuntu is also Debian-based, which we’re familiar with).
OpenEmbedded consists of Bitbake - a build tool written in shell and Python scripts - and metadata (recipes) that specify what to build.
(Bitbake also grew too large and was split into a separate project in 2004, like make)
The OpenEmbedded Project gained huge popularity among developers worldwide, supporting nearly 10,000 recipes and hundreds of machines. However, this growth made management increasingly difficult, leading to various improvement attempts.
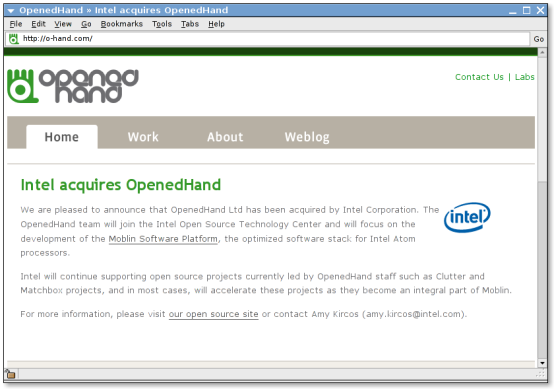
One of these was the Poky Linux Project, started in 2003 by the embedded startup OpenedHand. This project selected only hundreds of essential recipes and gained rapid popularity by supporting virtual environment builds through QEMU and SDK builds. (OpenedHand was acquired by Intel in 2008. No matter how hard I looked, I couldn’t find the acquisition price…)
Time passed, and in 2010, the Linux Foundation WG announced the Yocto Project. The core of the project was creating embedded Linux distributions based on Poky Linux.
From 2011, the overgrown OpenEmbedded Project was separated from Poky Linux as OpenEmbedded-Core (OE-Core). (The previous OpenEmbedded is called OE-Classic)
OE-Core focuses on supporting major architectures like ARM and x86, QEMU support, and even includes Sato-based GUI testing tools that run on X windows.
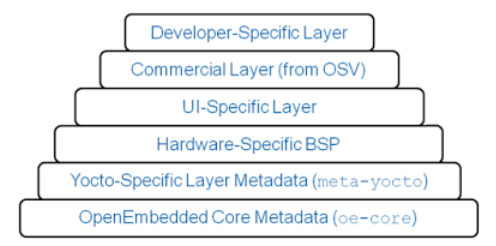
Through this long process of reducing size and splitting, it achieved the current Layered Architecture shown above, and by adopting a Pull Model instead of the previous Push model, it eliminated the possibility of project divergence.
3. Cross-build Overview
Now that you understand the history, readers who have done simple embedded development or cross-building will find Chapter 3 easy to follow.
As mentioned in the history, the Yocto Project uses Bitbake as a build tool based on Poky Linux, with metadata (recipes) as specifications, and Bitbake is the core functionality of the OpenEmbedded project.
So we need to focus on analyzing this Bitbake.
But…
It’s too much to know everything about Bitbake with its long history… Let’s briefly understand the important functions needed for building through simplified diagrams.
3.1 User Configuration
First things first - setting up the build environment.
Anyone who has done cross-building knows this is the most annoying and time-consuming part, but also the most important area.
Let’s look at the diagram below:
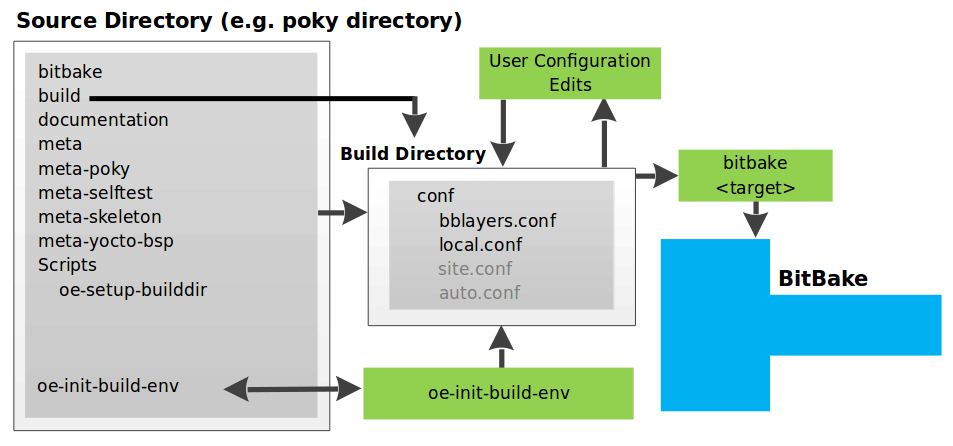
The Poky Project provides scripts to automate this part. That’s the oe-init-build-env script.
When you run the script, a Build Directory is created where all build-related work takes place.
The conf directory in the created Build directory allows User Configuration to be modified, which can also be changed via bitbake command line.
The information you can modify includes which of the vast metadata (recipes) to use in the build system, target machine settings, download paths for packages needed for building, cache paths, etc.
3.2 Source Preparation
 [Source: https://www.yoctoproject.org/docs/3.1/overview-manual]
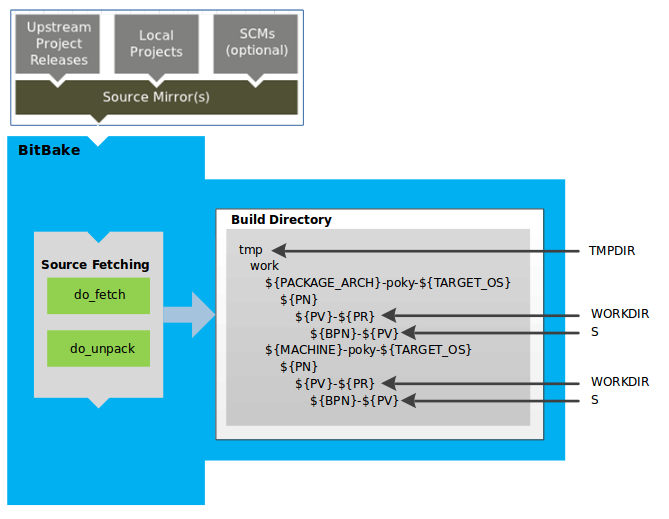
Once the foundation is laid, we need to bring our own software and attach it to the Yocto Project structure.
The recipe functions that handle this part are do_fetch and do_unpack. These two functions create a Working Directory within the Build Directory and copy the actual source code there.
This structure is designed to support various architectures and OSes from the same source.
3.3 Configuration & Compilation & Staging
[Source: https://www.yoctoproject.org/docs/3.1/overview-manual]
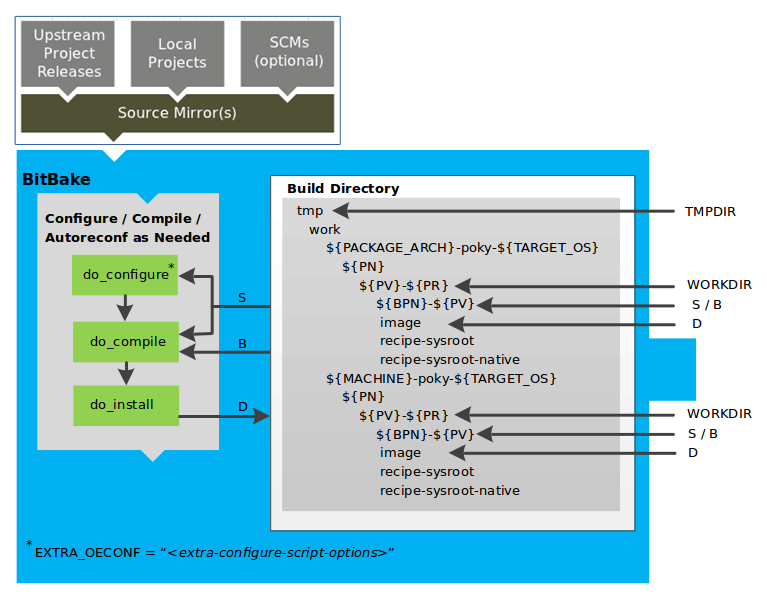
After bringing the original software source, the next process is compilation and installation.
This process will be more familiar if you know build tools like CMake or Autotool.
First, the do_prepare_recipe_sysroot function places two sysroots for cross-building in the Working Directory (target sysroot and sysroot-native).
Through do_configure, it extracts the build configuration files needed for compilation from the original source (S) to the Build Directory (B) (equivalent to the general cmake process).
The do_compile process proceeds with compilation in the Build Directory (equivalent to the general make process).
The do_install process places these compiled files in the installation target destination (D).
3.4 Package Classification
[Source: https://www.yoctoproject.org/docs/3.1/overview-manual]
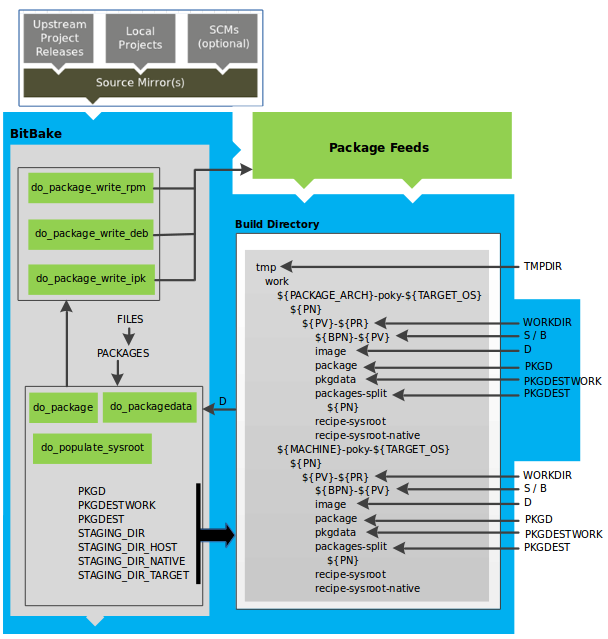
Once source compilation and installation are complete, it’s time to decide how to package and distribute them.
The Yocto Project supports three types of distribution formats: rpm, deb, and ipk.
The do_package, do_packagedata functions split and classify the files in the installation destination D for packaging.
Splitting packages can be understood by comparing it to how when we install python as an apt package in Ubuntu, it exists in various forms like python, python-dev, python-3.6, etc.
3.5 Image Generation
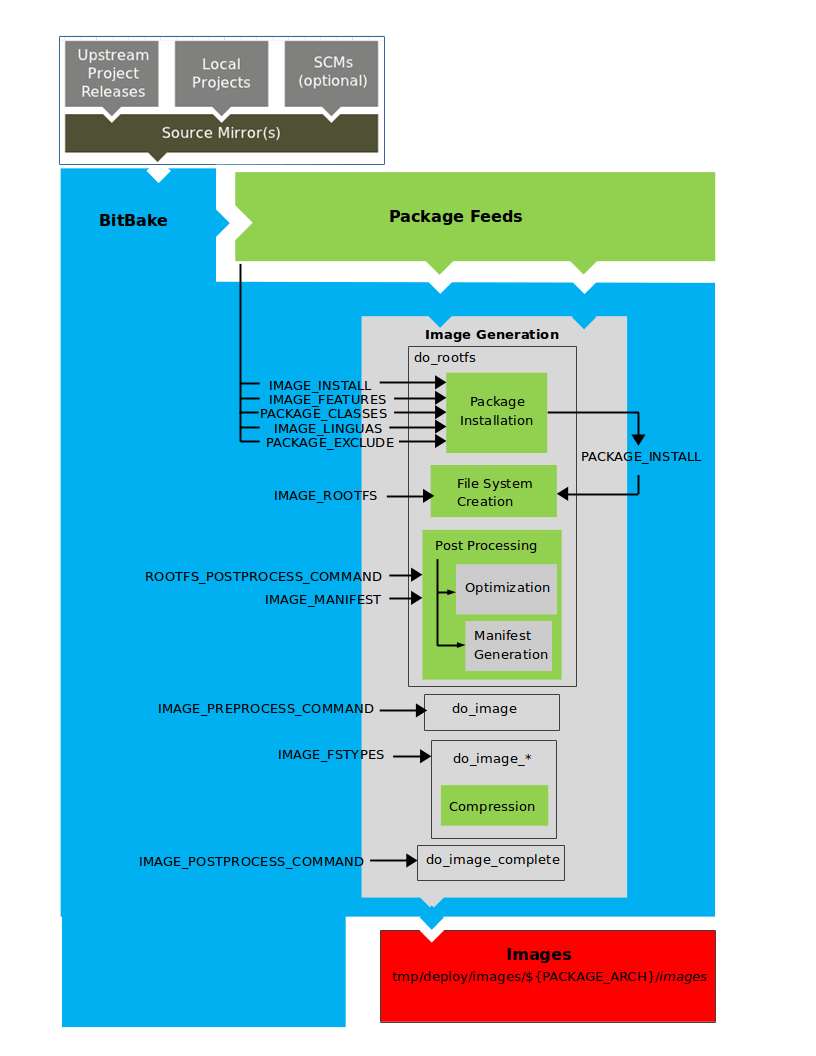
[Source: https://www.yoctoproject.org/docs/3.1/overview-manual]
Once packages are well-made, we can now use Bitbake to put them into the image’s rootfs (Root file system).
First, the do_rootfs function creates the image’s Rootfs with the packages created in the above process installed.
There are several important variables in this process that are very important, so let’s go over them:
- IMAGE_INSTALL: Lists packages from our created package collection (Package Feeds area) to include in the image
- PACKAGE_EXCLUDE: Lists what should not be installed
- PACKAGE_CLASSES: Selects the package type to use (rpm, deb, ipk)
- PACKAGE_INSTALL: Final package list to be installed in the image
After completing package installation, you can do some post-processing work.
In post-processing, manifest files are created and specific scripts are run, mostly for testing purposes.
Manifest files are used for test automation not only in virtual environments like Qemu supported by Poky but also in actual target environments. (For details, see testimage*.bbclass or testsdk.class)
This would be useful for building integration tests or even system tests in the V-cycle for deployment.
Once post-processing is complete, we’re finally ready to create the image to upload to the target.
The do_image function handles this role, providing do_image_* internally to handle different file systems (ext4, fat32, etc.) differently.
3.6 SDK Generation

Most people think this should just naturally work, and indeed, most of the processes mentioned above are in the DevOps domain.
For feature developers, going through image generation for cross-compilation is a huge waste of time and resources, so DevOps should create an environment where they can easily compile in SDK form.
Building this is very tedious but essential from a productivity standpoint. That’s why, as mentioned in the history, the Poky Linux project also considered this and provided it as a feature.
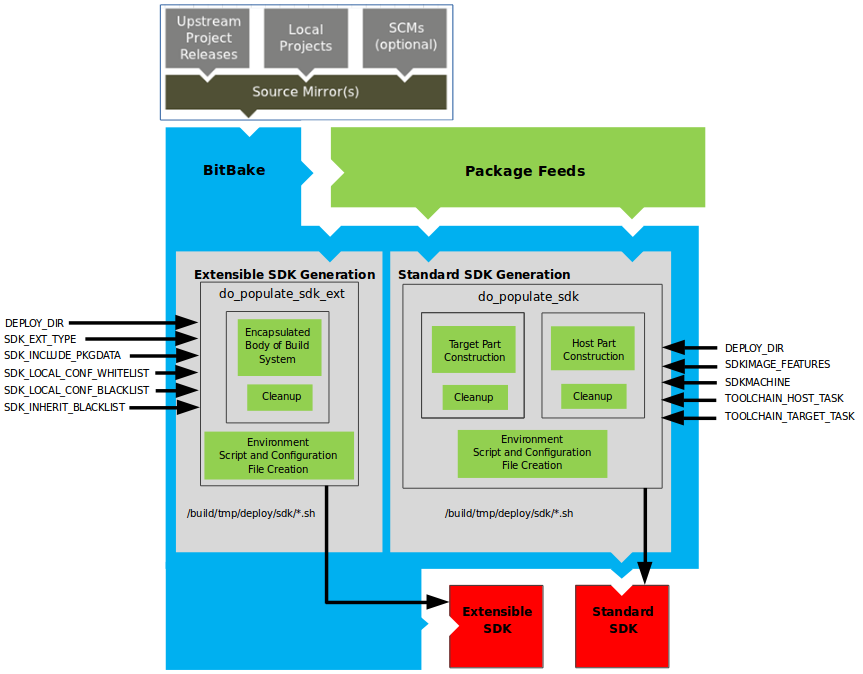
[Source: https://www.yoctoproject.org/docs/3.1/overview-manual]
Let’s assume packaging went well in the above processes.
If you use the Yocto Project, you can easily create SDKs from these packages using do_populate_sdk or do_populate_sdk_ext.
SDK installation files are typically created as /build/tmp/deploy/*.sh as shown in the diagram above.
With just that file, developers can easily set up a cross-build environment.
4. Conclusion
As of the end of 2020, automotive system platforms are a hot potato that not only automotive OEMs but also global IT giants, electronics, and semiconductor companies are rushing to grab.
Considering that not only vehicles but also the IoT world has Linux-based kernels, ecosystems that provide integrated build environments based on open source projects like Yocto will become even more popular.
In fact, looking at LinkedIn, companies like VW Group, BMW Group, Hyundai Motors Group, Toyota Group, as well as IT companies including automotive semiconductor chip manufacturers, Amazon, and Facebook are hiring senior-level Build Architects or Build Engineers who are familiar with the Yocto Project.
Since the Yocto project covers everything from kernel to application, you need to be proficient in at least 3 computer languages, requiring an enormous amount of study.
I also found it quite challenging while studying the Yocto build system, and I hope this article helps those who are studying from scratch like me. With that, I conclude this article.