GitHub에 GPG 서명 추가하기 - 완벽 가이드
GPG란?
안녕하세요! GPG는 GNU Privacy Guard의 약자이며, PGP라고도 불립니다. :D
우분투에 기본으로 포함되어 있는 강력한 암호화 프로그램입니다 - 꽤 편리하죠?
GitHub는 오픈소스 플랫폼이므로 누구나 공개 저장소를 클론하고 접근할 수 있습니다. 하지만 비공개 저장소나 민감한 프로젝트에서 협업할 때 누군가가 데이터를 엿보는 것은 분명히 좋지 않습니다.
그래서 GitHub는 pull request를 만들 때 GPG 서명을 사용하는 것을 강력히 권장하고(때로는 요구합니다). 이는 커밋이 정말로 여러분으로부터 온 것임을 증명하는 디지털 서명을 추가하는 것과 같습니다!
GPG 서명을 설정하는 방법을 단계별로 안내해드리겠습니다. 여기서는 간단히 설명하지만, 더 자세한 정보는 아래 참고 링크를 확인해주세요.
1. GPG 키 생성하기
$ gpg --full-generate-key
gpg (GnuPG) 2.2.4; Copyright (C) 2017 Free Software Foundation, Inc.
This is free software: you are free to change and redistribute it.
There is NO WARRANTY, to the extent permitted by law.

Please select what kind of key you want:
   (1) RSA and RSA (default)
   (2) DSA and Elgamal
   (3) DSA (sign only)
   (4) RSA (sign only)
Your selection?
저는 RSA 암호화 방식(기본 옵션)을 선택했습니다.
RSA keys may be between 1024 and 4096 bits long.
What keysize do you want? (3072) 4096
Requested keysize is 4096 bits
GitHub는 최소 4096비트를 요구하므로 4096으로 설정합시다!
Please specify how long the key should be valid.
         0 = key does not expire
      <n>  = key expires in n days
      <n>w = key expires in n weeks
      <n>m = key expires in n months
      <n>y = key expires in n years
Key is valid for? (0) 0
저는 게을러서 만료되지 않도록 설정했습니다. 그냥 0을 입력하세요!
GnuPG needs to construct a user ID to identify your key.

Real name: Jay Lee
Email address: jayleekr0125@gmail.com
Comment: lol
You selected this USER-ID:
    "Jay Lee (lol) <jayleekr0125@gmail.com>"

Change (N)ame, (C)omment, (E)mail or (O)kay/(Q)uit? O
We need to generate a lot of random bytes. It is a good idea to perform
some other action (type on the keyboard, move the mouse, utilize the
disks) during the prime generation; this gives the random number
generator a better chance to gain enough entropy.
We need to generate a lot of random bytes. It is a good idea to perform
some other action (type on the keyboard, move the mouse, utilize the
disks) during the prime generation; this gives the random number
generator a better chance to gain enough entropy.
이름, 이메일 및 기타 정보를 입력한 다음 GPG 키 생성을 진행하세요.
아, 그리고 비밀번호를 잊지 마세요! 😅
2. GPG 키 확인하기
$ gpg --list-secret-keys --keyid-format LONG
gpg: checking the trustdb
gpg: marginals needed: 3  completes needed: 1  trust model: pgp
gpg: depth: 0  valid:   1  signed:   0  trust: 0-, 0q, 0n, 0m, 0f, 1u
/home/jayleekr/.gnupg/pubring.kbx
---------------------------------
sec   rsa4096/037ED189F6F42EF3 2020-10-08 [SC]
      A95244C509A02D9F0790CFB0037ED189F6F42EF3
uid                 [ultimate] Jay Lee (lol) <jayleekr0125@gmail.com>
ssb   rsa4096/38DDEF7B4E6758A4 2020-10-08 [E]
여기 제 GPG 키 정보가 있습니다! 제 GPG 키 ID는 037ED189F6F42EF3입니다.
공개 키 암호화 파일은 /home/jayleekr/.gnupg/pubring.kbx에 있습니다 (SSH 키처럼 백업해뒀습니다, 하하).
이제 이 ID를 사용해서 공개 키를 생성해봅시다!
3. 공개 키 생성하기
공개 키를 생성하려면 다음과 같이 ID를 사용하세요:
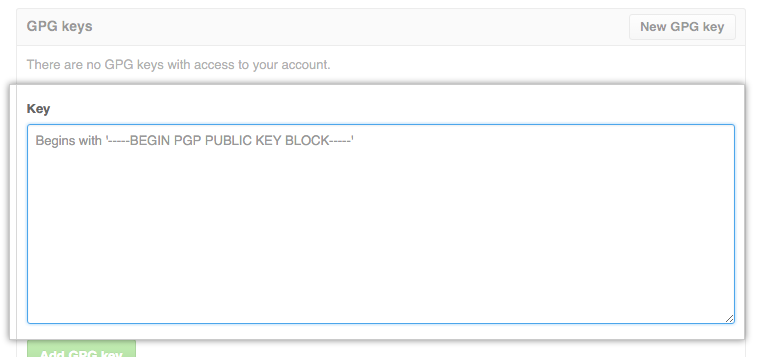
$ gpg --armor --export 037ED189F6F42EF3
-----BEGIN PGP PUBLIC KEY BLOCK-----
XXXXXXXXXXXXXXXXXXXXXXXXXXXXXXXXXXXXXXXXXXXXXXXXXXXXX
XXXXXXXXXXXXXXXXXXXXXXXXXXXXXXXXXXXXXXXXXXXXXXXXXXXXX
...
...
-----END PGP PUBLIC KEY BLOCK-----
위와 같이 BEGIN부터 END까지의 출력을 받게 됩니다. 이 전체 블록을 복사해서 GitHub 개인 설정에 붙여넣으면 끝입니다!
4. GitHub에 GPG 공개 키 추가하기

5. Git에 GPG 키 알려주기
앞서 GPG ID를 확인했습니다:
$ gpg --list-secret-keys --keyid-format LONG
gpg: checking the trustdb
gpg: marginals needed: 3  completes needed: 1  trust model: pgp
gpg: depth: 0  valid:   1  signed:   0  trust: 0-, 0q, 0n, 0m, 0f, 1u
/home/jayleekr/.gnupg/pubring.kbx
---------------------------------
sec   rsa4096/037ED189F6F42EF3 2020-10-08 [SC]
      A95244C509A02D9F0790CFB0037ED189F6F42EF3
uid                 [ultimate] Jay Lee (lol) <jayleekr0125@gmail.com>
ssb   rsa4096/38DDEF7B4E6758A4 2020-10-08 [E]
이제 git에 이 키를 알려줍시다:
$ git config --global user.signingkey 037ED189F6F42EF3그리고 터미널(tty)에도 알려줍시다!
$ test -r ~/.bash_profile && echo 'export GPG_TTY=$(tty)' >> ~/.bash_profile
$ echo 'export GPG_TTY=$(tty)' >> ~/.profile
6. GPG 서명으로 커밋하기
간단합니다 - -S 옵션만 추가하면 됩니다!
$ git commit -S -m "#IssueNumber"이제 GPG 키를 만들 때 설정한 비밀번호를 입력하면 서명과 함께 커밋이 완료됩니다!